Master 2025 sash chain connector installation with this step-by-step guide. Ensure smooth window operation & safety. DIY tips included!
Основные выводы
Understanding the core principles of sash chain connector installation ensures efficiency and long-term reliability before diving into detailed steps. This overview highlights critical considerations for a successful project, emphasizing preparation, safety, and fundamental mechanics. Key aspects include selecting the correct connector type for your window weight and size, ensuring all necessary tools are readily available, recognizing the importance of precise measurements, and acknowledging critical safety protocols throughout the process. A grasp of these fundamentals significantly reduces the risk of errors during the physical installation phase detailed later.
Always verify the load rating of the sash chain connector matches or exceeds the weight of your window sash; this is non-negotiable for safe operation.
The following table summarizes the essential preparatory and conceptual knowledge required:
| Feature | Importance | Примечание |
|---|---|---|
| Connector Load Rating | Must support window sash weight | Prevents chain failure & potential damage |
| Precise Measurements | Critical for alignment & smooth operation | Measure twice, install once |
| Tool Readiness | Prevents workflow interruption | Drill, level, screws, safety glasses |
| Safety Protocols | Mandatory for injury prevention | Includes securing ladder, eye protection |
| Understanding Function | Aids troubleshooting & future maintenance | Know how tension & alignment affect movement |
Focusing on these elements upfront streamlines the subsequent installation steps and contributes significantly to the window’s smooth, safe, and durable performance. Proceeding without this foundational knowledge often leads to avoidable complications or safety hazards.
Sash Chain Connector Installation Prep
Proper preparation is crucial before beginning any sash chain connector installation. A well-prepared start significantly reduces risks and streamlines the entire process. First, ensure the window is fully accessible and the surrounding workspace is clear of obstructions and debris. Safety should always be a priority; wearing protective eyewear is highly recommended to shield against any falling particles or debris dislodged during work. Carefully examine the existing window hardware, paying close attention to the condition of the sash, the pulleys, and the path the chain will travel. Look for any signs of wear, damage, corrosion, or misalignment that could interfere with the new connector’s function or indicate underlying issues needing resolution first. This visual inspection helps identify potential problems before installation commences, preventing complications later. Gathering the precise tools and materials comes next, ensuring everything is within reach for a smooth workflow.
Gathering Essential Tools & Materials
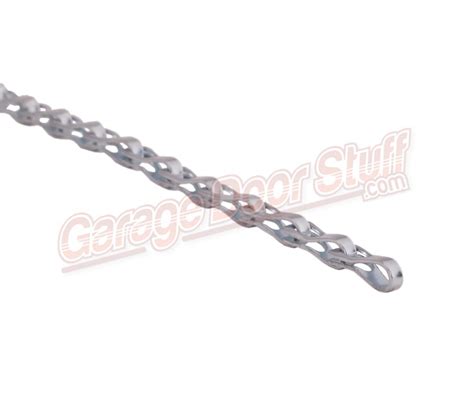
Begin by assembling all necessary items before starting the sash chain connector installation. This preparation ensures efficiency and minimizes interruptions. Essential tools typically include a reliable tape measure for precise measurements, a sturdy flathead screwdriver and a Phillips screwdriver (sizes #1 and #2 are common), needle-nose pliers for handling small parts and chain links, and a sharp utility knife or small hacksaw for trimming chain if needed. Safety glasses are crucial to protect eyes from debris. Required materials primarily consist of the new sash chain connector kit itself, which should include the connector mechanism and sufficient replacement chain. Verify the kit matches your window’s weight capacity and chain type. Additionally, have small replacement screws on hand, as originals can be stripped or lost. Optionally, a cordless drill/driver with appropriate bits can expedite screw removal and installation, though hand tools offer sufficient control. Having everything organized and within reach streamlines the subsequent mounting process.
Step-by-Step Mounting Instructions
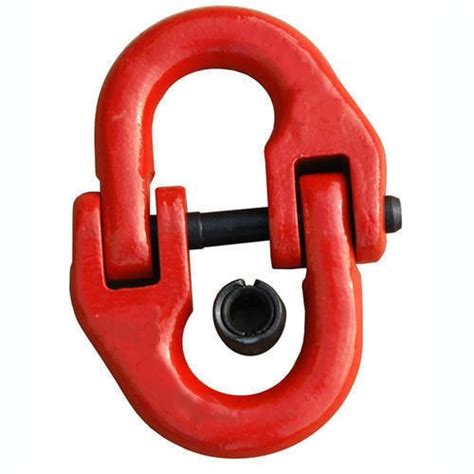
Begin by positioning the sash chain connector precisely at the pre-marked location on the window frame or glazing bead. Ensure the connector’s pivot point aligns correctly with the intended path of the chain. Hold the connector firmly in place and use a cordless drill equipped with a Phillips head bit to drive the supplied mounting screws through the designated holes. Apply steady pressure while drilling to prevent stripping the screw heads, tightening securely until the connector sits flush against the frame without any wobble or play. It is advisable to wear safety gloves and eye protection during this step to shield against metal filings or debris.
Next, carefully route the sash chain through the connector’s channel, confirming it moves freely without binding or catching on any internal components. Avoid over-tightening the screws, as this can distort the connector body and impede chain movement. Once secured, perform a preliminary manual test by gently pulling the chain back and forth through the connector to verify smooth operation before proceeding to the adjustment phase. This initial verification helps identify any immediate alignment issues requiring correction.
Setting Up Sash Chain Connectors
With the mounting points prepared and the window sash securely supported, positioning the chain connectors is the next critical step. Carefully align the connector body with the designated attachment point on the window sash frame. Ensure the connector sits flush against the frame surface, avoiding any twisting or misalignment that could impede chain movement or cause premature wear. Secure the connector firmly using the appropriate fastening hardware, typically screws provided with the hardware kit. Tighten these screws sufficiently to prevent slippage during operation, but avoid over-tightening, which could strip the screw holes or deform the connector. Verify that the connector’s pivot point allows free rotation and that the chain link slot is oriented correctly to receive the chain link without binding. Proper initial setup here is fundamental to establishing a smooth travel path for the chain within the window counterbalance system and pulley housing, typically requiring a clearance of approximately 1/8 inch on each side.
Adjusting Connectors Smooth Operation
Following the secure mounting of your sash chain connectors, precise adjustment is essential for achieving effortless window movement. Begin by manually operating the window sash through its full range, carefully noting any areas of binding, excessive slack, or uneven travel. Minor binding often indicates slight misalignment; gently loosen the mounting screws just enough to allow subtle repositioning of the connector body, then retighten securely. For instances where the chain feels too loose, causing the sash to drop abruptly, or overly tight, creating difficult operation, locate the tension adjustment mechanism—typically a small set screw or sliding component on the connector itself. Make incremental adjustments, testing the sash movement after each small change. The goal is consistent, even movement with slight resistance when opening and a controlled, gentle descent when closing, without any sudden drops or jerky motion. Pay close attention to how the chain interacts with pulleys and tracks; smooth, quiet operation without grating sounds confirms correct adjustment. Ensuring this friction-free movement not only enhances user experience but also minimizes wear on the chain and hardware over time.
Essential Safety Checks Post-Installation
Before considering the installation complete and resuming regular window operation, conducting thorough safety verifications is paramount. Systematically test the window’s movement by raising and lowering it several times through its full range. Observe closely for any hesitation, unusual noises like grinding or scraping, or unexpected resistance, which could indicate binding or misalignment. Visually inspect the entire sash chain path, confirming the connector remains securely fastened at both the sash and counterweight attachment points with no signs of loosening screws or bolts. Check that the chain runs freely within its track or pulley system without any kinks, twists, or areas where it might jump off its intended path. Verify the counterweight system operates smoothly and provides consistent, controlled assistance; the window should not slam shut nor require excessive force to lift. Pay particular attention to the security of any access panels covering the counterweight cavity to prevent accidental access, especially crucial in homes with children. If any instability, excessive play in components, or erratic movement is detected during these checks, immediate readjustment or re-securing of the connector hardware is necessary to mitigate potential operational hazards or hardware failure.

DIY Troubleshooting Common Issues
Even with careful installation, occasional hiccups can occur with sash chain connectors. Should you encounter chain jamming or uneven window movement, several common issues can often be resolved with simple DIY checks. First, verify that the chain itself isn’t twisted or kinked within the track; a slight bend can cause significant resistance during operation. Gently guide the chain to ensure it runs straight and freely. If the window binds at a specific point, inspect the track for accumulated debris, dust, or hardened lubricant. A thorough cleaning using a soft brush or cloth often restores smooth travel. Next, assess the connector’s positioning relative to the sash. Minor misalignment, where the connector isn’t perfectly perpendicular to the chain’s path, can create friction. Loosen the mounting screws slightly, reposition the connector for optimal alignment, and retighten securely – avoid overtightening, as this can deform components. Finally, confirm the chain tension is appropriate; excessive slack can cause the chain to jump or derail, while excessive tightness strains the system. Small adjustments to the connector’s mounting position typically resolve tension problems. Addressing these points promptly ensures reliable window operation and prevents premature wear.
Maintaining Sash Chains Longevity Tips
Ensuring your sash chains and connectors deliver years of reliable service requires consistent, simple maintenance practices integrated into your regular home upkeep routine. Begin by establishing a schedule for lubrication; applying a light, silicone-based lubricant to the chain links and the connector pivot points every six months significantly reduces friction and wear, preventing the stiffness that often leads to premature failure. Simultaneously, make it a habit to wipe down the chains monthly with a clean, dry cloth to remove accumulated dust, grime, and debris, which can act as abrasives inside the connector mechanism. During these cleanings, visually inspect the entire length of the chain for any signs of stretching, kinking, or visible damage like cracks or deformities, paying close attention to the areas where the chain engages with the connector sprockets. Also, check the connector body itself for any loose screws, cracks, or signs of metal fatigue, especially after periods of heavy window use. Gentle operation, avoiding sudden jerks or slamming the window shut, further minimizes stress on the components. Incorporating these straightforward checks and cleanings dramatically extends the functional lifespan of your sash chain system, maintaining smooth operation and avoiding unexpected repairs.

Заключение
Ultimately, successfully installing a sash chain connector directly translates to significantly improved window operation and enhanced safety. By meticulously following the preparation steps, precise mounting instructions, and critical adjustment procedures outlined previously, you ensure the sash moves smoothly within its frame. Remember, the safety checks performed post-installation are not merely a final step but an essential safeguard for long-term security. While DIY installation is achievable with careful attention to detail, the troubleshooting tips provided offer solutions should minor issues arise during initial setup or later use. Therefore, consistent maintenance, as detailed in the longevity section, becomes the key factor in preserving the effortless function and reliability of your window’s sash chain mechanism for years beyond 2024. This comprehensive approach guarantees optimal performance from your newly installed connector.
Вопросы и ответы
Can I reuse my existing sash chain connectors during window renovation?
Reusing connectors is not recommended unless they are in pristine condition; worn or corroded connectors compromise safety and smooth operation. Always inspect for stretching, rust, or deformation and replace if any doubt exists.
How do I know if the sash chain tension is correct after installation?
Proper tension allows the window sash to move effortlessly without sagging or requiring excessive force. If the sash drops when released or feels jerky, revisit the adjustment steps outlined in the guide for precise tensioning.
What type of lubricant is best for maintaining sash chains, and how often should it be applied?
Use a silicone-based lubricant or dry graphite powder specifically designed for window hardware. Apply sparingly to the chain links and connector pivot points every six months, or more frequently in dusty or coastal environments, to prevent binding and wear.
Are there specific safety checks I should perform regularly after installation?
Conduct monthly visual inspections for loose mounting screws, signs of chain wear (like stretching or fraying), and ensure connectors engage smoothly without catching. Test the window’s ability to stay open at various positions and close securely. Address any issues immediately.


